
Dělení polynomů
1. Popis standardní metody algoritmu
Dělíme-li dva polynomy $f, g$ jedné proměnné, používáme podobné rozmístění objektů jako při dělení dvou celých čísel.
- Dělenec $f$ a dělitel $g$ zapíšeme vedle sebe.
- U obou polynomů najdeme členy s nejvyšším exponentem a vydělíme je.
- Výsledek $q_1$ tohoto dílčího dělení zapíšeme napravo od dělitele a zpětně jej vynásobíme s dělitelem $g$.
- Součin $q_1 \cdot g$ zapíšeme pod dělenec $f$, přičemž členy se stejným exponentem píšeme pod sebe.
- Spočteme rozdíl $f_1 = f - q_1 \cdot g$
- Celý postup opakujeme s polynomy $f_1, g$ – dostáváme postupně polynomy $f_2, f_3, \dots, f_n$, resp. $q_2, q_3, \dots, q_n$. Algoritmus končí v momentě, kdy polynom $f_{ n+1 } $ má nižší stupeň než dělitel $g$.
- Součet $q = q_1 + q_2 + q_3 + \dots + q_n$ je výsledkem dělení polynomů $f, g$ se zbytkem $f_{ n+1 } $.
Pro názornost uvádíme i konkrétní příklad, viz Animace 1:
2. Návrh možných adaptací
1. Důsledné opisování veškerých podvýrazů:
Důsledné opisování veškerých podvýrazů, se kterými se v algoritmu pro dělení polynomů pracuje, včetně krátkého vysvětlení všech mezivýsledků, je ukázáno ve výpočtu v editoru Lambda na Obrázku 1:
Příklad 2: Dělení polynomů s pomocí lineárního zapisování
Odkaz na soubor ve formátu lambda:
polynomial_division_2_cs.lambda
 Obrázek 1:
dělení polynomů – ukázka důsledného lineárního zapisování výpočtu včetně komentáře
Obrázek 1:
dělení polynomů – ukázka důsledného lineárního zapisování výpočtu včetně komentáře
2. Zápis polynomů pouze pomocí koeficientů v tabulkovém procesoru:
V prvním řádku tabulkového listu se zapisují pouze mocniny členů dělence, dělitele a podílu, přičemž se jednotlivé polynomy oddělí prázdnou buňkou. Na dalších řádcích se pod danou mocninu vkládá už pouze koeficient příslušného členu. V případě zápisu dalších polynomů $ f_1, f_2, \dots, f_n, f_{ n+1 }$ nižšího stupně, které vznikají zpětným násobením dělitele a aktuálního dílčího členu $q_i$ výsledného podílu, se využívá dalších řádků pod dělencem. Viz ukázka výpočtu v editoru MS Excel na Obrázku 2:
Příklad 3: Dělení polynomů s pomocí tabulkového procesoru
Odkaz na soubor ve formátu MS Excel:polynomial_division_3_cs.xls
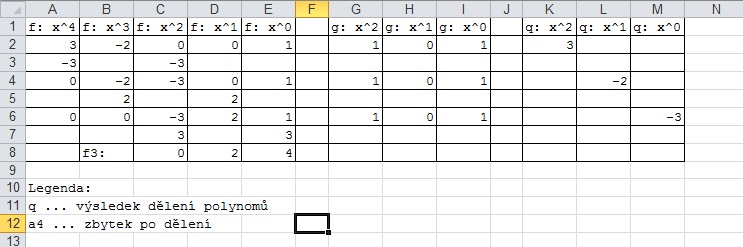 Obrázek 2:
dělení polynomů a jejich zápis pouze pomocí koeficientů v tabulkovém procesoru
Obrázek 2:
dělení polynomů a jejich zápis pouze pomocí koeficientů v tabulkovém procesoru
3. Zápis veškerých polynomů pod sebou v jednom (textovém) editoru:
Následující metoda je založena na tom, že polynomy, se kterými nevidomý student aktuálně pracuje, si nechává vždy na sousedních řádcích, aby se mezi nimi mohl snadno pohybovat, a to pouze jedním stiskem klávesy šipka dolů či šipka nahoru. Viz ukázka výpočtu v editoru Lambda (Animace 2):
4. Zápis všech polynomů do tří souborů, případně listů tabulkového procesoru:
- do prvního samostatného souboru (případně listu) vkládáme na jednotlivé řádky postupně dělenec a polynomy $f_1, f_2, \dots, f_n, f_{ n + 1}$ nižšího stupně, které vznikají zpětným násobením dělitele a aktuálního dílčího členu $q_i$ výsledného polynomu. Respektujeme tak umístění zmíněných polynomů známé v případě standardního průběhu algoritmu. V případě použití tabulkového procesoru můžeme využít metodu zápisu polynomu pomocí jeho koeficientů.
- do druhého samostatného souboru (případně listu) umístíme pouze dělitele.
- do třetího samostatného souboru (případně listu) vkládáme postupně členy $q_1, q_2, \dots, q_n$ výsledného podílu $q = q_1 + q_2 + q_3 + \dots + q_n $.
V průběhu výpočtu se pak přepínáme mezi jednotlivými soubory
(resp. listy) pomocí klávesové zkratky Alt+Tab (resp. Ctrl+PgUp,
Ctrl+PgDown) a upravujeme je s výjimkou dělitele, který zůstává stejný.
3. Diskuze nad výhodami a nevýhodami
Shrneme nyní výhody a nevýhody všech čtyř metod adaptace algoritmu dělení polynomu polynomem.
První metoda je výhodná, co se týče srozumitelnosti zapsaného výpočtu opravujícímu – není třeba žádného dalšího vysvětlení. Bohužel je poměrně neúsporná, nevidomý student je nucen vkládat vysvětlující text. Další nevýhodou je zdlouhavost výpočtu, případně paměťové nároky – student si buď musí zapamatovat dělitele nebo jej musí pokaždé vyhledat v předcházejícím textu, což jej značně zpomalí. I při závěrečném stanovení výsledku dělení je nucen projít znovu celým výpočtem a "sesbírat" jednotlivé členy $q_1, q_2, \dots, q_n$.
Druhá metoda respektuje rovinné uspořádání polynomů dodržované při standardním provedení algoritmu vidící osobou. Postup výpočtu je tak srozumitelný opravujícímu, i když jej může zpočátku mást fakt, že se pracuje pouze s koeficienty členů jednotlivých polynomů. Účastníci workshopu na ICCHP Summer University 2012 v Linci však připomněli i několik nevýhod:
- Dosažitelnost jednotlivých koeficientů není snadná – nevidomý student se poměrně zdlouhavě pohybuje mezi třemi objekty a nemá možnost ignorovat konkrétní hodnoty polynomů.
- V tabulce se navíc těžko orientuje a často musí ověřovat, s jakou mocninou je daný koeficient spojen.
- Chce-li ušetřit čas, tak je neustále zaměstnán udržováním mezivýsledků ve své paměti při současném hledání pozice, na kterou je může vložit.
Možné řešení problému popsaném v bodě 2 navrhl jeden z nevidomých účastníků workshopu: "Pokud by si nevidomý uživatel mohl u libovolné buňky s koeficientem přečíst mocninu umístěnou ve stejném sloupci, avšak v 1. řádku, výrazně by to usnadnilo orientaci v tabulce. Stačilo by za tím účelem přidat skript či makro, které by nahradilo zdlouhavý přesun na 1. řádek a zpět pomocí kurzorových šipek.
Analogickou adaptaci nabízí prof. José Enrique Fernández del Campo. Jeho návrh zjednodušuje naši druhou metodu v tom, že se nevidomý student pohybuje pouze mezi dvěma skupinami koeficientů. Prof. del Campo vychází z toho, že dělitel se v průběhu výpočtu nemění, takže pod něj může postupně umisťovat i členy (nikoli pouze koeficienty) výsledného podílu. Tím se částečně řeší 1. problém. Sledujeme pouze dvě skupiny koeficientů (dělence a dělitele), přičemž členy výsledného podílu zapisujeme pod dělitele. Dosažitelnost objektů, se kterými v algoritmu pracujeme, je tím pádem snadnější. Nabízíme ukázku adaptace v editoru Lambda, v němž je pro zápis polynomů vhodně použita funkce pro editaci matic, viz Obrázek 3.
Příklad 5: Dělení polynomů podle návrhu prof. del Campa
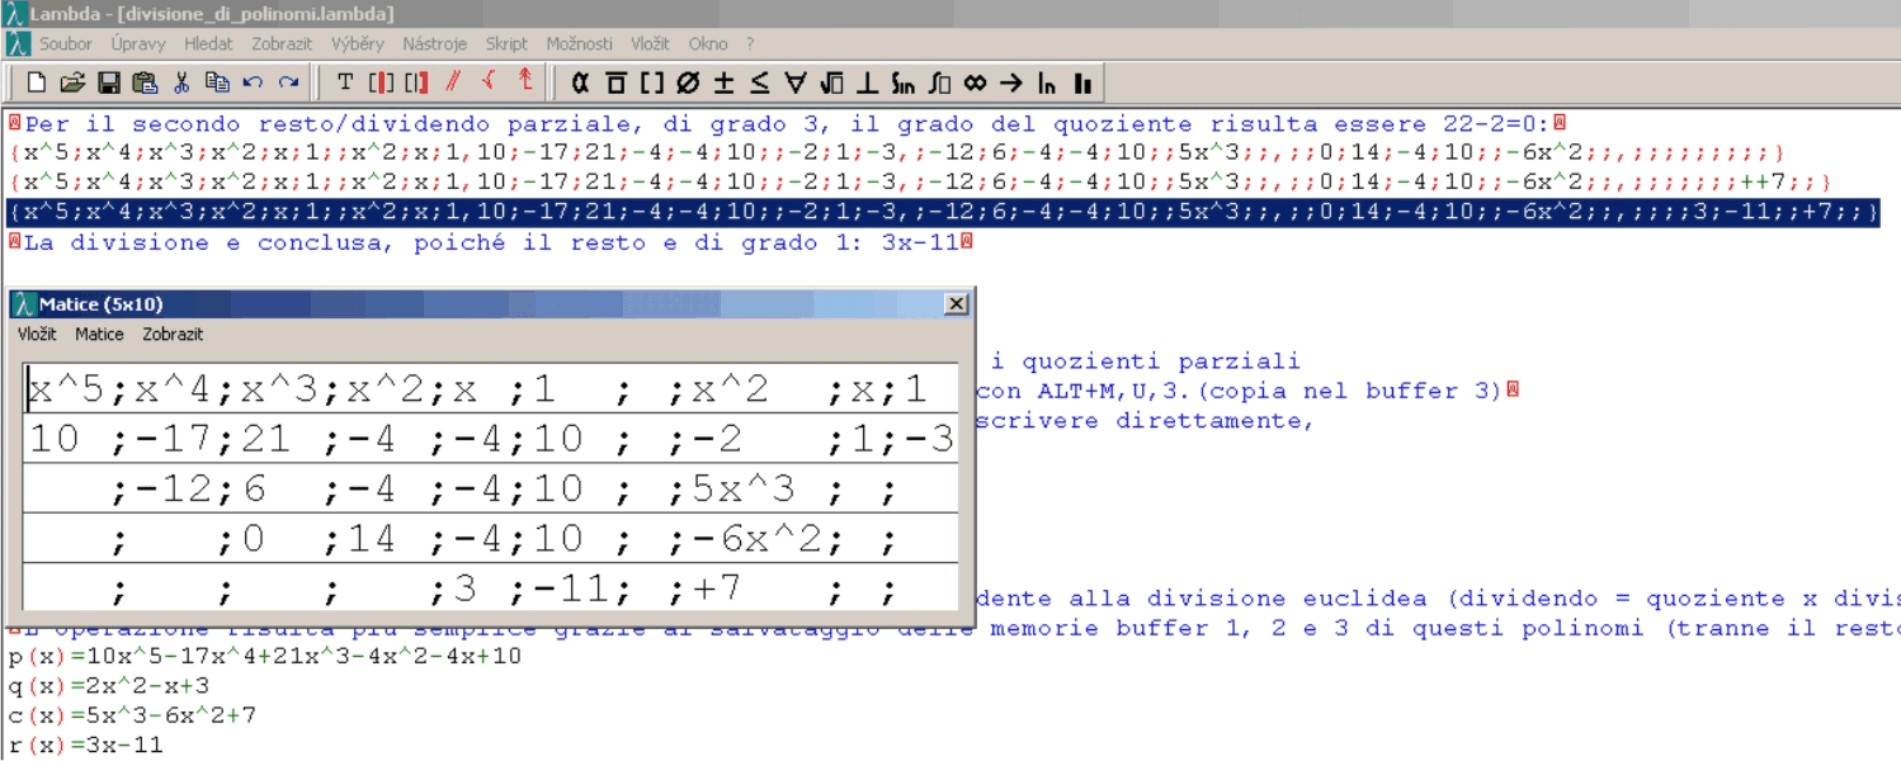 Obrázek 3:
dělení polynomů v Lambdě dle návrhu prof. del Campa
Obrázek 3:
dělení polynomů v Lambdě dle návrhu prof. del Campa
Zmiňme ještě článek Cristiana Bernareggiho s názvem "Non-sequential Mathematical Notations in the LAMBDA System", ve kterém se zabývá i adaptací algoritmu pro dělení polynomů. Jeho přístup je v podstatě totožný s návrhem prof. del Campo, liší se pouze v tom, že zápis polynomu pomocí koeficientů používá pouze v případě dělence a polynomů $f_1, f_2, \dots, f_n, f_{ n + 1}$, které zapisuje pod sebe.
Třetí metoda byla účastníky workshopu hodnocena nejpříznivěji. Její nespornou výhodou je optimální dosažitelnost objektů, se kterými aktuálně pracujeme. V každém kroku výpočtu provádíme určitou operaci se dvěma polynomy a její výsledek zapisujeme na předem dané místo. Proto je výhodné, když je máme co nejblíž. Nevidomý student si nejdříve vytvoří prázdný řádek pro zapsání výsledku operace a následně se mezi oběma polynomy pohybuje stiskem jediné klávesy. Snadno a bez paměťových nároků provede zadanou operaci a její výsledek vloží nad nebo pod právě zpracovávané polynomy, čímž si zajistí snadnou dosažitelnost objektů i pro následující kroky. Zápis výpočtu není ihned srozumitelný opravujícímu, protože nerespektuje standardní umístění objektů, se kterými se v algoritmu pracuje. Pokud však student veškeré polynomy zapisuje včetně jejich pojmenování, postačí krátké vysvětlení v úvodu výpočtu.
Konečně čtvrtá metoda skýtá podobnou výhodu jak ta třetí, a to snadnou dosažitelnost objektů polynomů, se kterými aktuálně pracujeme. Není však příliš použitelná, chce-li nevidomý student prezentovat postup výpočtu opravujícímu. Veškeré polynomy jsou rozděleny do tří souborů (resp. listů), učitel provádějící kontrolu je tak nucen se mezi nimi neustále přepínat, což není pro vidící osobu příliš přívětivé. Je proto žádoucí, aby student sám pomohl učiteli tím, že po ukončení výpočtu zkopíruje obsah všech tří souborů (resp. listů) do jediného dokumentu.